Hydrajaws Verify - User Manual
The Hydrajaws Verify Reporting system allows on-site pull tests to be automatically recorded and compiled into a digital report using the Hydrajaws VERIFY App on a mobile phone or tablet device.

Reports can be sent directly to clients or managers and are stored in the cloud to be accessed remotely anywhere on a browser in a users own company dashboard. The comprehensive report will include all test information including a pass or fail result, a visual results graph, fixing details, site location co-ordinates, date and time. Notes, images and photos taken on-site can be also be added.
Using the Verify Dashboard a company administrator can review all test reports from all company users. They can also add notes to reports and send them directly to customers.
The Dashboard contains all essential information including:
- All company users and licences.
- Gauges that have been registered on the app, and their calibration dates.
- A GPS map containing all test sites.
- A list of Hydrajaws Approved International Service Centres.
This revolutionary system has many advantages over the current industry technique which include:
- Uneditable digital results recorded with time, date and GPS location of each test are indisputable proof a test has been completed.
- Streamline your workflow by pre-setting job details before arriving on-site.
- Graphs and photos can be viewed with clients to explain why tests may not have met the required standard (not possible using analogue gauges).
- Automated processes allow for quicker testing and less set up time – especially on sites with many identical repetitive tests to perform.
- This system allows for more accountability for time spent on-site.
- Test evidence can be provided electronically from site to clients in a completed report, saving time on unnecessary paperwork (requires Wi-Fi or Mobile Network Signal).
Terms used in this document :
Test– A single pull test.
Site visit (or Job) – A series of Tasks at a Site.
Client– Client details.
Site – A location for the Site visit or Job.
Template – Preset details of a test – Fixing type, substrate etc.
Company – This refers to a company of any size – from a company with 1 app user, to a company with many testers out in the field.
It is essential that the operating instructions are read before a test is carried out for the first time and that the system is fully tested before going out on-site, to get accustomed to the equipment.
Signing up to Hydrajaws Verify Reporting System
Open a web browser and go to the Hydrajaws portal at:
Click ‘Sign up now’.
A form will appear that will ask for your sign-up details. A confirmation code will be requested by emailing a security code to your supplied email address.
Enter all your details in the form (name, address etc.) and click ‘NEXT’.
Create a password.
After successful account creation you will be directed to your dashboard (See section 2 : The Dashboard).
The Hydrajaws Verify Dashboard
2.1 The Dashboard
The Hydrajaws Verify Dashboard is used by an administrator to perform several tasks including:
- Reviewing previous test history.
- Adding summary notes to and creating PDF reports from any previous tests.
- Paying for and setting up licences and users where appropriate.
- Locating on a map where tests have been performed.
- Finding an international service centre.
To activate the dashboard go to a browser on any laptop or desktop computer and go to: dashboard.hydrajaws.co.uk
Sign in using your user email and password.
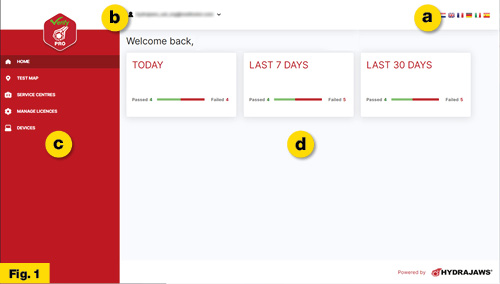
The Hydrajaws Verify Dashboard will be displayed as shown in Fig.1.
It has four main parts :
Fig.1.a – The language select row
Fig.1.b – The administrator profile
Fig.1.c – The main menu
Fig.1.d – The main data area
2.2 The Home Screen
The home screen will show a summary of previous test results and indicate whether they passed or failed – in the main data area (fig 1.d).
2.2.1 select your preferred language
Click on the country flag of your preferred language in the language select row (fig 1.a). The dashboard will switch to this preference.
2.2.2 Edit your profile
Click on the administrator profile (fig 1.b) to bring up the profile menu to:
- Log off
- Reset password
- View profile to change user details
2.2.3 The Main menu
On the left side is the main menu (fig1.c) with the following sections:
Home – Returns to the home screen
Test Map – Lists previous tests and displays location map
Service Centres – A list of international approved Service Centres
Manage Licences – for User and Licence management
Devices – a list of devices (e.g. gauges) currently used
2.3 Service Centres Section
This section shows a list of current active approved Hydrajaws Service Centres and a map indicating their location.
Service Centres can recalibrate your gauge and arrange repairs and servicing.
2.4 Devices Section
Use this section to view all existing devices (gauges) that have been used in creating a test report.
The list will show the following information:
Device name
This is the name of a device that has been used.
Calibration expiry date
This is the date that the device physical calibration runs out.
Note: Hydrajaws advise that a gauge must be calibrated each year to remain in correct and legal use.
When first activating a gauge, check it’s calibration expiry date is correct. If it is wrong then contact Hydrajaws with the details.
Last active date
This is the last time a device was used.
Last used by
This Is the last user to use this device.
Note: The ‘Device Section’ information is generated automatically by the system and cannot be altered.
2.5 Manage Licences Section
The Licences section (fig 6) allows an administrator to control licences and manage Users. Licences are listed at the upper half of the screen and Users are listed at the lower half of the screen along with the total number of licences and the number of licences assigned. 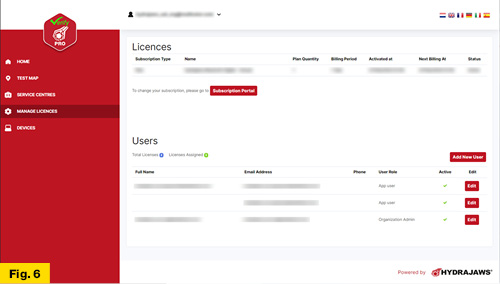
Licences allow a user to use the Hydrajaws Verify app on a mobile device (1 app user per licence). A licence cannot be used by more than one user at the same time.
TEAMS Licences must be paid for in advance by subscription by annual subscription. These licences can be assigned to registered users and used with any number of gauges. Initial TEAMS subscription includes 3 user licences and further licences can be added.
Note: A user must never sign into the Hydrajaws App with a different user’s identity. This would result in a report with an incorrect engineer name which would render it invalid.
2.5.1. Licences
Activating your account
- Log in to your dashboard
- Go to Manage Licences (fig 6).
- Click ‘Subscription Portal’ – select a plan – ‘Hydrajaws Verify Teams (Annual)’ or ‘Hydrajaws Verify Pro (FREE)’.
Then view your order. - Proceed to checkout and you will be taken to the billing address (no credit card details required).
Complete the fields and click ‘next’.
Proceed to ‘add your payment details’ (Only required for ‘Teams’).
Complete the required fields.
An approval screen will be displayed – click ‘SUBSCRIBE’. - You will be taken back to the Licence section with the licence added with either 30 days FREE rolling trial for ‘PRO’ or 90-day FREE trial for ‘Teams’
NOTE: This licence will need to be assigned to an App user.
Change/cancel a licence
To change, add or cancel a licence Click on the subscription portal.
This will take you to a new browser window and your manage subscriptions page. From here you can:
– Add or remove a licence by clicking the payment plan.
The next screen will display subscription details. Click Edit Subscription to allow you to amend the quantity of licences. Click cancel subscription to cancel licences.
- Change account information – user name and email.
- Change Billing & Shipping Addresses.
- Change payment methods – enter a new method.
- See Billing History – a history of charges.
Close window when finished to return to the Dashboard window.
2.5.2 Users
Creating Users
There are 2 types of user:
1 – Organisation Administrator
Has access to all the features of the dashboard and can buy licences and assign users. An administrator can only use the
app if a licence is subscribed and assigned to them.
2 – App User
Has access to the full Hydrajaws app and only the following features of the Dashboard: Home, Test Map (user’s jobs only) and Service centres.
By default, the first person to sign up for the company will be the Organisation Administrator. They will be responsible for inviting (by email) other company users to sign up.
Any number of Organisation Admin Users can be added but they will not be given App access by default.
Any number of App Users can be added but a licence must be available to assign to them.
To create another user click the ‘Add New User’ button.
A form will appear to fill in the details of the new user including:
Full name – Enter the full name of user
Email address – Enter the new users email address.
Phone – enter the phone number.
User role – Choose a role for the user – either:
- App user (licence must be available) or
- Organisation admin (If app access is required then tick the box).
Note: to create a user with app access you must have an available licence.
Fill in all details and click ‘Send invitation’.
- They will be sent an invitation email to register.
- They must follow the link and sign up.
- They will then be taken to their dashboard.
Assign a licence to a user
To assign a licence to a user click their Edit button. This will take you to their update user screen.
This will allow you to assign any available licences by ticking the ‘App access required?’
You can also decide if they are active or not.
When finished click ‘Save’.
The user will now have ‘App Access’ indicated.
The user will need to download the Hydrajaws app and log on. (see Hydrajaws Verify Digital App section).
 2.6 The test map (Report page)
Use this section to access all previous test jobs performed by your users and to edit and send reports.
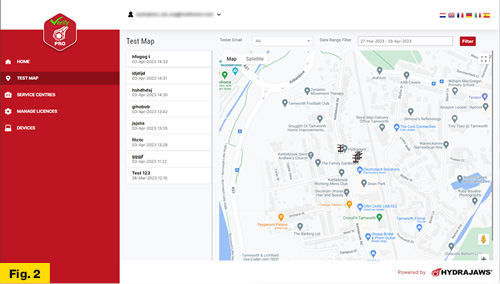
The test map screen will list all previous test jobs and display them in a location map (Fig. 2).
Test job locations are indicated by a small Tester icon.
2.6.1 Finding a test report
To find a report either :
– Locate it in the list (scroll down if necessary).
or locate the test site on the map.
You can filter the dates to assist in doing this.
The date range of displayed test jobs is shown at the top of the map. This can be adjusted by clicking on the date and setting the range (including the time) – then pressing the ‘Filter’ button.
2.6.2 Sending a report
Once a job is chosen – either click its icon or click its name in the job list.
This will bring up the job report window which will show all information entered by the user on-site – including results, photos, and notes.
From this job report window, the 3 buttons at the top give the following options:
- Download PDF – this will open a PDF of the report in a separate browser window where it can be saved to store or send to the client.
- Download CSV – This will download a copy of the report in a Comma Separated Values(.csv) format for the data to be analysed in another program.
- Summary Report – this will open the summary report window for adding notes and your company logo.
To close this window click the cross in the top right corner.
Summary Report Window
This form allows you to add notes and add your company logo to the report. It also allows you to add additional notes such as:
- Name of Witness
- Approved by
- Applicable Test Standards
- Test Method
- Summary of Results
- Recommendations
Upload Company logo
To add your company logo to the report:
- Click on the Company logo button.
- A window will open to allow you to navigate to the required logo.
- Select the logo and click open
- The logo will appear on the report (with the option to delete it).
When all edits are complete – click save to return to the report.
These edits will now appear in the PDF report when generated.
The HYDRAJAWS Verify app
The Hydrajaws Verify App can pair up a Hydrajaws Gauge to a mobile or tablet device and record test results from a pull test and compile them into a report.
This report will be stored on the Hydrajaws Verify Dashboard to review later. The report can also be sent via email to a site manager or client from the job site.
3.1 Download the Hydrajaws Verify app
The Hydrajaws Verify Pro App is available on Apple or Android devices and is free to download and use, and will work when activated with a free user licence (see section 2.5.1 ‘Licences’).
3.1.1 App installation on Apple devices
To install the app on your Apple device go to the Apple App Store usually located on your home screen.
![]()
1. In the App Store search for ‘Hydrajaws Verify’.
This will bring up the Hydrajaws App Icon (fig. 7).
2. Install App.
3. Enable GPS and Bluetooth
To enable Bluetooth: Go to Settings and switch Bluetooth to on.
To allow GPS: Go to Settings then Privacy:
Switch Location services on.
This may vary from one device to another. Please consult your device’s operating manual.
3.1.2 App installation on Android devices
The Hydrajaws Verify App can be loaded onto an Android device by downloading it from the Google Play store.
Installation screens and methods may vary. For more information, please consult the operating manual of your device.
1. Go to the Google Play Store.
![]() 2. Search for : ‘Hydrajaws Verify’.
2. Search for : ‘Hydrajaws Verify’.
This will bring up the Hydrajaws Verify Icon (fig. 7).
3. Install App.
Ensure any requests for App Permissions are allowed (i.e. locations, nearby devices and camera)
Enable GPS and Bluetooth on the Android Device
For the operation of the GPS ensure that your device has enabled GPS.
This will usually be under Settings and Location access. Depending on your device and version of the Android OS, make sure all options such as Location, Location services, and Location reporting are enabled.
Ensure Bluetooth is switched on and an internet connection is available.
This may vary from one device to another. Please consult your device’s operating manual.
3.2 Signing in to the app
Double tap the Hydrajaws app icon to open the app. The first screen will present a form to sign-in with your user email and password.
Note : To use the app you will be required to subscribe to a user licence as provided by your company administrator (see section 2.5.1 ‘Licences’ section).
After a successful sign-in you will be taken to the Home screen.
3.3 The home screen
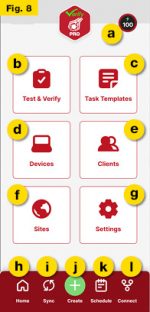
The Home screen (fig 8) has three areas:
- The top bar
- Main Area
- Bottom bar
3.3.1 The top bar
Gauge connection/Battery level indicator (fig 8.a)
The battery level indicator is located the top of the screen in the top bar in a dark red circle.
When a gauge is connected this icon will indicate the percentage battery life left in the Gauge.
3.3.2 The Main Area
The main area contains six buttons for performing main tasks:
- Test (fig 8.b) – Starts a test (see 3.10 ‘Performing a test’)
- Task Templates (fig 8.c) – Goes to Task page (see section 3.5 ‘Task Templates’)
- Devices (fig 8.d) – Goes to Devices page (see section 3.7 ‘Devices’)
- Clients (fig 8.e) – Goes to Clients page (see section 3.4 ‘Clients’)
- Sites (fig 8.f) – Goes to Sites page (see section 3.8 ‘Sites’)
- Settings (fig 8.g) – Goes to the settings page (see section 3.6 ‘Settings’)
3.3.3 The Bottom Bar
The bottom bar contains a home icon on the left and a Schedule button on the right.
- Home button (fig. 8.h) – This will take you to the home page
- Sync button (fig. 8.i) – This will synchronise data to and from the Verify servers
- Create (fig. 8.j) – This will open the Create Menu (see section 3.3.4 ‘The Create Menu’).
- Schedule button (fig. 8.k) – This will take you to the Schedule list (see section 3.9 ‘Schedule’)
- Connect (fig. 8.l) – Pressing this icon will take you to the Devices page where you can connect a device (see section 3.7 ‘Devices’)
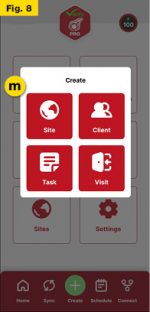
3.3.4 The Create Menu
Pressing the green ‘Plus’ icon (fig 8.j) in the middle of the bottom bar will take you to the Create Menu.
The Creator menu (fig 8.m)
When activated the Creator Menu will pop-up and provide four options :
- Site – Create a site page (see section 3.8 ‘Sites’)
- Client – Create a client page (see section 3.4 ‘Clients’)
- Task – Create a task page (see section 3.5 ‘Tasks’)
- Visit – Schedule a site visit page (see section 3.9 ‘Schedule’)
3.4 Clients
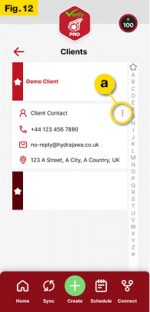
The clients page are a list of your clients and their details.
Tap client name to display their details (fig 12).
Amend client details
To amend a template go to the Client page and select the client to be amended.
A small menu on the right opens a Client amendment menu (fig 12.a).
Two options are available:
- Edit – Allows you to edit all aspects of the client.
- Delete – Will delete the selected client.
Add a Client
To create a new client press green ‘Plus’ icon (fig 8.j) to bring up the Create Menu (fig. 8.m) and select the Client icon.
This will display the New Client page form.
Details can be entered such as Name, Address and email.
Fields denoted with an asterisk (*) are mandatory and must be completed to progress.
Press ‘SAVE’ to save this client.
3.5 Task templates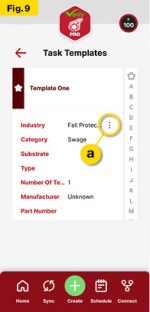
Task Templates are a list of details for a specific pull test which can include Anchor Type, Manufacturer, Time, Force and Test Type.
The Task Template Page will display a list of templates available in alphabetical order.
Tap a template to display its details (fig 9).
3.5.1 Create a Task Template
To create a Task Template click the Create menu (fig 8.j) to bring up the Create Menu (fig. 8.m) and select the Task icon.
This will display the New Task Template page.
From here you can input a new task template which includes the following information:
Select displacement if required.
Enter a name for the task.
From the drop down menus select:
- Select Industry
- Select Test Type
- Select Category (Above options must be set first)
Press ‘NEXT’ to enter further details.
From the drop down menus select:
- Manufacturer
- Component
- Metric or Imperial Units
- Size
Press ‘SAVE’ to save the Task Template.
3.5.2 Amend a Template
To amend a template go to the Task Templates page and select the Task to be amended.
A small menu on the right (fig. 9a) opens a Template amendment menu.
Two options are available:
- Edit – Allows you to edit all aspects of the task.
- Delete – Will delete the selected task.
Note: the demo template cannot be edited.
3.6 Settings
The settings menu will display three options:
- Edit profile
- Select Language
- Log out
Edit Profile
After signing in with your details – all of your user details can be edited in the displayed form.
Select language
Displays a menu with a list of languages to choose from.
Log out
This allows the current user to log out of the app.
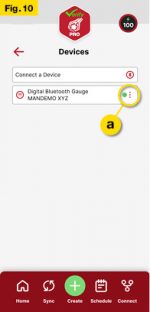
3.7 Devices
Devices page (fig. 10) allows you to see a list of all devices used by the current user in a pull test job and allows you to connect a gauge to the app.
The red dot by the device name indicates the gauge is not connected to the App. When connected by Bluetooth the dot will change to green.
The small menu on the right (fig 10.a) will open an action menu that allows you to connect to the gauge or forget the device (removing it from the list).
Tap a device name to see its details which include battery percentage level, last active date and its Calibration expiry date.
This calibration expiry date will be part of the test job report.
Note: Gauges must be calibrated every year. A gauge out of calibration may give an incorrect reading and invalidate a test.
3.7.1. Connecting a device
To connect a device follow these instructions:
- Open the Hydrajaws app and sign in.
- Turn the gauge on (see ‘Digital Gauge’ section).
- Ensure the gauge is displaying a flashing Bluetooth icon.
- From the home page press the top bar Bluetooth icon or go to the Devices page (fig 10).
- If the gauge is in the list shown then select its menu (fig 10.a) and press connect. If the gauge name is not in the list then press ‘Connect a Device’ and look for the gauge name in the list of found devices.
Note: The gauge will not show up in ‘found devices’ if already listed in the app. - When selected, the app will connect with the gauge and the indicator will turn green. At the top bar the gauge/battery level indicator will display a percentage.
To disconnect a device
Turn the gauge off or select the listed gauge name menu and select ‘Disconnect’.
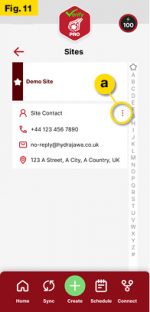
3.8 Sites
The sites page is a list of sites visited and their details.
Tap site name to display its details (fig. 11).
Amend site details.
To amend a template go to the Site page and select the site to be amended.
A small menu on the right opens a Site amendment menu (fig 11.a).
Two options are available:
- Edit – Allows you to edit all aspects of the site.
- Delete – Will delete the selected site.
Add a Site.
To create a new site click the green ‘Plus’ button (fig 8.j) to bring up the Create Menu (fig. 8.m) and select the Site icon – this will display the New Site page form.
Details can be entered such as Name, Address and email.
Fields denoted with an asterisk (*) are mandatory and must be completed to progress.
Press ‘SAVE’ to save this site.
3.9 Schedule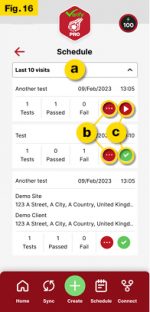
The Schedule screen shows a list of the jobs completed and jobs scheduled to be started (fig 16).
Select a time scale from the drop down menu (fig 16.a) of:
- Last 10 visits
- Today
- +/- 7 days
- This Month
The jobs list contains the title of the job, its date (to be done or the date it was completed) and brief details.
The job will also contain a completed symbol (tick in green circle) or a play symbol (arrow in red circle (fig 16.c)) as well as a menu button (red circle (fig 16.b)).
Schedule a job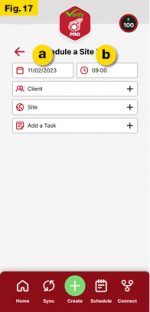
To schedule a new job press the green ‘Plus’ icon (fig 8.j) to bring up the Create Menu (fig. 8.m) and select the Visit icon.
This will display the ‘Schedule a Site visit’ page form (fig 17).
First enter the name for this job (Enter Site visit reference).
Select date for site visit and time by pressing the date or time buttons (fig 17.a).
Then enter the client name, site and task. These can be chosen from predefined options or created from the creator menu (see section 3.4 ‘Clients’, section 3.8 ‘Sites’ and section 3.5 ‘Tasks’ in this manual).
Note: Fields denoted with an asterisk (*) are mandatory and must be completed to progress.
Press ‘Next’ to save this scheduled visit.
The job will now be listed in the ‘Schedule’ list.
Scheduled jobs
Scheduled jobs on the list contain: the title of the job, its date (to be done) and brief details.
They will also contain a play symbol (arrow in blue circle) as well as a menu button (red circle).
The menu button displays an option to edit or delete the selected job.
Press the play symbol to start the job immediately.
Completed jobs
Completed jobs on the list contain: the title of the job, its completed date and brief details.
They will also contain a completed symbol (tick in green circle) as well as a menu button (red circle).
The menu button displays an option to email a report of the selected job.
3.10 Performing a test
Press the ‘Test & Verify’ button located top left on the main screen area (fig. 8.b).
A menu will display three options:
- Quick Test
- New Site Visit
- Today’s Site Visits
New Site Visit
This option allows you to set up a new job.
First enter the name for this job (Enter Site visit reference).
Then enter the client name, site and task. These can be chosen from predefined options or created from the creator menu (see section 3.4 ‘Clients’, section 3.8 ‘Sites’ and section 3.5 ‘Tasks’ in this manual).
When a task is selected its details are displayed along with a box to fill in how many tests are required.
Different tasks can be added along with the number of times it needs to be performed.
Connect a gauge if not already connected (see ‘3.7.1 Connecting a device’).
When all details are filled in press ‘Start Test’.
First task on the list will start.
Quick Test
This option allows you to set up a quick test.
First enter the name for the job (Enter Site visit reference).
Then enter the task. These can be chosen from predefined options or created from the creator menu (see section 3.4 ‘Clients’, section 3.8 ‘Sites’ and section 3.5 ‘Tasks’ in this manual).
When a task is selected its details are displayed along with a box to fill in how many tests are required.
Different tasks can be added along with the number of times it needs to be performed.
Connect a gauge if not already connected (see Connect gauge section).
When all details are filled in press ‘Start Test’.
First task on the list will start.
Today’s Site Visits
If any jobs are currently in progress they will be listed here (see section 3.10.2 ‘Take a break’). A small number will indicate how many unfinished jobs are stored.

3.10.1. Performing a task
When a task is started the Load Test Screen (fig 13) will be displayed.
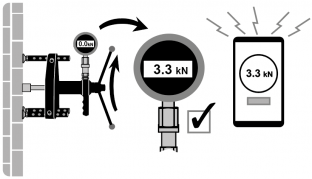
1. Wind up the load on the tester.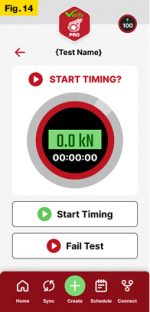
This will display the load applied exactly as shown on the digital gauge.
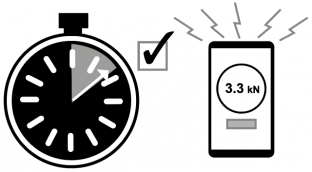
When the target load is reached the mobile device will vibrate.
A ‘Start Timing’ button will appear (fig 14).
If the target load cannot be reached due to fixture failure or slippage then press ‘Fail test’ and enter the reason for failure.
2. Check load is set above target load (to allow for slippage) and press ‘Start Timing’
The timer will begin.

3. When the preset time has elapsed (fig 15.a)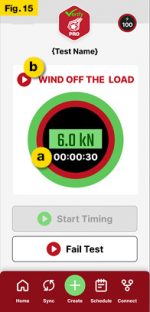 the mobile will vibrate and you will be instructed to wind off the load (fig 15.b).
Note: If a destructive test was selected then there is no timer and the Fail Test button must be pressed.
Note: If the load drops below target during the timer running then the test will default to a FAIL and you will be asked to wind off the load and describe why the fixing failed (e.g.. ‘Not Held Threshold Value’).
4. Wind down the load.
When the load reaches zero the report for the test will appear (see ‘The After Test Report’).
FINISH or NEXT TEST will appear depending on whether another test is scheduled to be done (see ‘Take a break’).
The After Test Report screen
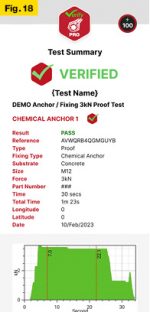
The After Test Report screen (fig 18) shows several information sections:
- Indicate a PASS or FAIL.
- Name of the task
- Type of fixing
- Details of test including:
-
- Result
- Substrate
- Type – (type of test)
- Time – (timed period for test)
- Total time – (total time taken for test)
- Location coordinates
- Date
- Results Graph (fig 19.a)

- Gallery (fig 19.b).
Take a photo to add to the report or download an existing photo by pressing the camera icon. - Notes (fig 19.d). Add any comments or observations to the test report.
-
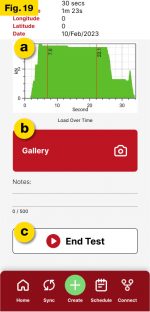
Press ‘End Test’ when complete.
You will then be taken to the schedule screen (see section 3.9 ‘Schedule’).
Note: Your test result will also contain a 14-digit reference number. This is unique to the test and is used to store and identify the test data in a tamper-proof way (see section 4 ‘Evident Proof’).
3.10.2. Take a break
After a task is complete, and further tests are scheduled, there is an option to ‘Take a break’. This will allow you to carry on the job (eg start the next task) at a later time.
Press ‘Take a break’ after a task. The schedule page will be displayed with the unfinished job displayed (fig. 16). Tap the job name to display its details. On the right will be a job menu (fig 16.b) and a play button (fig. 16.c).

Tap the job menu to:
- Edit the task – this will allow you to edit the client, site and add further tasks.
- Complete the visit – this will complete the site visit and remove any outstanding tasks.
You can now close the app and take a break until ready to continue the job.
When ready to continue
Ensure the Gauge is connected (see section 3.7.1), go to Home menu and ‘Test & Verify’ and ‘Today’s Site Visits’. Tap this to display the unfinished job.
Press job menu (fig. 16.b) to edit or close off the job(‘complete’), or play (fig. 16.c) to continue with the next task.
Evident Proof
The Hydrajaws Verify Digital Reporting System captures and records data from tests in real-time and pushes this information directly to the cloud.
To ensure this data is safe, immune to tampering, and indisputable, it uses Evident Proof technology.
Evident Proof
Evident Proof transforms data, documents, transactions, and workflows into tamper-proof, unchangeable records.
The Hydrajaws Verify Digital Reporting System data is connected to the Evident Proof platform, its unique system encrypts your data, timestamps it, and stores it securely on the blockchain.
These encrypted pieces of data are added to an unchangeable chain of blocks in chronological order. Once added it is not possible for your data to be altered, deleted, or tampered with.
This means:
- It is possible to track and verify that anchors and fixings have been tested to the correct standards.
- Thanks to the Evident proof protocol this data is now legally verifiable confirming the correct checks have been carried out in accordance with the Law.
- Clients Reduce their risk.
- Acts as proof for Insurance claims.
- Full accountability is now in place with a transparent audit trail.
Terms and Conditions
Hydrajaws – Privacy Policy
This privacy policy sets out how Hydrajaws Ltd (known as Hydrajaws, we, us) uses any information that you give us when you use the Hydrajaws App and the Hydrajaws Cloud Dashboard Service.
We are committed to protecting your privacy. If we ask you to provide certain information which can identify you when using our site or the App we will use it in accordance with this privacy policy.
We may change this privacy policy from time to time by updating this page. Please check this page from time to time to ensure that you are happy with any changes.
What we collect
We may collect the following information:
- name
- contact information, such as your address, email address, or phone number
- information on your preferences and interests. Information that you provide by filling in forms on our site. This includes information provided at the time of registering to use our site, subscribing to our services
- we may also ask you for information when you report any problem with our site
- if you contact us, we may keep a record of that correspondence
- details of transactions you carry out through our site
- details of your visits to our site including, but not limited to, web traffic data, location data, weblogs, and other communication data, whether this is required for our own billing purposes or otherwise
- (i) information from your device (such as location, readings, time stamp, gauge serial numbers, or photographs) relating to a Hydrajaws Digital Gauge or your mobile device that you agree to provide to us (this is done via your mobile device where you have installed our Hydrajaws App) (Collected Data)
What we do with your information and sharing your information.
We use this information to:
- enable us to provide the Hydrajaws Cloud Dashboard Service
- allow your business to use the Hydrajaws Cloud Dashboard Service
- to analyse and re-use data in aggregate
- understand your needs, manage Hydrajaws Cloud Dashboard Service, and to provide you with a better service
- carry out our obligations, including without limitation account management, customer care, processing your applications and orders, and monitoring and maintaining the quality and security of our network and services
- allow you to participate in interactive features of our service when you choose to do so
- notify you about changes to our service.
The nature of our service is that certain information that we collect will be shared. In particular, we may share Collected Data with your employer or whoever you contract with, if you are working as a contractor to them or are contracted by them to a third party. They may then share the Collected Data with their end customer.
We may also use your data, or permit selected third parties to use your data, to provide you with information about goods and services that may be of interest to you, and we or they may contact you about these by post or telephone.
We may extend our services beyond the UK. This means that your data may be held outside the UK or outside the European Economic Area where different laws, rights, and protections exist in respect of personal data.
IP addresses and Cookies
We may collect information about your computer, including where available your IP address, operating system, and browser type, for system administration and to report aggregate information to our advertisers. This is statistical data about our users’ browsing actions and patterns and does not identify any individual.
Cookies are small text files that are placed on your computer by websites that you visit. They are widely used in order to make websites work, or work more efficiently, as well as to provide information to the owners of the site.
For the same reason, we may obtain information about your general internet usage by using a cookie file that is stored on the hard drive of your computer or other device used to access our site. Cookies contain information that is transferred to the drive of your computer or device. They help us to improve our sites and to deliver a better and more personalised service.
They enable us:
- To estimate our audience size and usage pattern.
- To store information about your preferences, and so allow us to customise our sites according to your individual interests.
- To speed up your searches.
- To recognise you when you return to our sites.
These cookies are used to collect information about how visitors use our site. We use the information to compile reports and to help us improve the site. The cookies collect information in an anonymous form, including the number of visitors to the site, where visitors have come to the site from, and the pages they visited.
How do I change my cookie settings?
Most web browsers allow some control of most cookies through the browser settings. To find out more about cookies, including how to see what cookies have been set and how to manage and delete them, visit www.aboutcookies.org or www.allaboutcookies.org.
Unless you have adjusted your browser setting so that it will refuse cookies, our system will issue cookies when you log on to our sites.
Security
We are committed to ensuring that your information is secure. To prevent unauthorised access or disclosure, we have put in place physical and electronic procedures to safeguard and secure the information we collect online. Be aware that the transmission of information via the internet is not completely secure. Although we will do our best to protect your personal data, we cannot guarantee the security of your data transmitted to our sites; any transmission is at your own risk. Once we have received your information, we will use strict procedures and security features to try to prevent unauthorised access.
Controlling your personal information
Other than as set out elsewhere in this Privacy Policy, or the sale of all, or a significant part of our business, we will not sell, distribute or lease your personal information to third parties unless we have your permission or are required by law to do so.
Under the General Data Protection Regulation, you may request details of personal information which we hold about you. If you would like a copy of this information, please contact us at: [email protected]. We may charge a fee for this and may require that you give evidence of your identity.
If you have any questions about this Privacy Policy please send an email to: [email protected]
If you believe that any information we are holding on you is incorrect or incomplete, please contact us as soon as possible and we will correct the information we are holding.